Crochet Dragon Scale Gloves
On top of writing I use my hands for crocheting. I can never sit still, I always have to be doing something and sometimes I cause myself some pain by creating beautiful things to wear or for the house. I kept seeing these gloves, variations of the gloves, and wanted to try my hand at them. About two months ago I gave it a whirl.
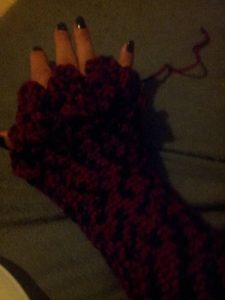
Now you won’t find a pattern here but you will find my instructions on how I made this glove, then reworked it for the second glove. I don’t have any pictures of that one yet because I haven’t finished it but this is the first one.
I started with a chain, made it big enough to fit snugly around the area I wanted to cover and started working by slip stitching to join. I then worked a row of single crochets around, sl st to join, then did a row of dc. These are American instructions by the way.
I then increased and decreased, putting the piece on to gauge whether or not to do so, and used hdc for 25 rows. I wanted these to be custom fitted so I increased and decreased where I saw the need for it. You may need more rows, or less, but this is how I did it.
For the dragon scales I followed an instructional video on how to do the scales, then figured out they were facing the wrong way. The pictures of the one I wanted to recreate show the scales facing the other way. So I tore all of that out and redid it. I did this by starting the scales with new yarn and attached them to the glove. I formed an area for my thumb and that is my glove.
The scale stitch is a stitch I call the hand-breaker. My hands ache after only a few rounds but I like the look of it. When I have some time I plan on finishing the second glove and doing one more for another yarn I have. I have two gloves and almost a third, meaning one glove in red and black and one in brown and white. And two-thirds of another red and black haha.
I know these aren’t your typical instructions but I thought there might be others out there like me that just have to try it and don’t want to use someone elses pattern. This, then, is how I did it. Others might now a better way of doing it or have better instructions. But there you go. Oh, do remember that when you’re working these stitches to either go in the loop of the stitch your working on or under it. I have one glove that I went under on and another where I went into the stitch. I like the look of into the stitch better.
Anyway, I hope that helps and that you’ll enjoy this.